How to Create a Private Blockchain [Step-by-Step Guide]

![How to Create a Private Blockchain [Step-by-Step Guide]](/v3/img/containers/blog_main/blockchain.jpg/0ee7c10cd1b2699b0fec51a87d63af75/blockchain.jpg?id=1739046670)


You know how most people picture blockchain, right? They're probably thinking of big, open networks like Bitcoin or Ethereum – places where anyone can jump in, check out transactions, and see all the data. But as blockchain starts moving into areas beyond just money, like managing supply chains, healthcare records, or company finances, you quickly see where those public networks might not quite fit.
And that's exactly where private blockchains step in. They offer a kind of "members-only" club for blockchain, where access is super tightly managed. Only users who've been approved can read or write to the ledger, which is a huge win for privacy, security, and making sure everything lines up with regulations. These features make private blockchains a much better fit for organizations that really care about control and keeping things confidential, even if it means a bit less decentralization.
In this guide, I'll talk you through what a private blockchain is, bring some examples of private blockchain use cases, and show you how to create a private blockchain.
#What is a Private Blockchain?
A private blockchain functions like its public cousin in terms of core architecture—blocks of cryptographically secured data, consensus algorithms, and decentralized trust. However, access is restricted, and the network is often smaller and faster. It’s not “less” of a blockchain—it’s just tailored for different goals.
For instance, in a private setup, validators may be selected based on organizational roles rather than open mining or staking. You can also control what data is visible to which participants, and build systems that are both performant and compliant with industry regulations.
#Real-World Use Case: Walmart’s Blockchain for Food Safety
Here's a prime example: take Walmart and their food traceability system, which they built using Hyperledger Fabric. Before they brought blockchain into the picture, trying to figure out where a single mango in their supply chain came from would take over six days. But with a private blockchain up and running, that time plummeted to a mind-blowing 2.2 seconds!
The whole point wasn't to decentralize the entire food system; it was all about boosting transparency, building trust, and speeding things up among their trusted network of partners. And that's where the real strength of a private blockchain lies.
#Why Build Your Own Private Blockchain?
Building your own blockchain, instead of using ready-made solutions, gives you complete control over its core aspects like transaction consensus (e.g., Proof of Authority, RAFT, IBFT), access rules, and performance tuning. This customization ensures the blockchain operates exactly as you need it to, free from the issues of public networks like unpredictable fees or congestion.
Moreover, the process of building it offers a valuable learning experience, deepening your understanding of system architecture, node management, cryptographic security, and smart contracts, ultimately enabling powerful, custom-made solutions for various applications.
#Core Components of a Private Blockchain
Alright, before we jump into actually setting things up, it's super important to get a handle on the basic parts that make up any private blockchain. It doesn't matter if you're messing around with Ethereum, Polygon Edge, Hyperledger, or even just building something totally from scratch with Geth or Besu – the core pieces are pretty much the same. Think of it like getting the engine, frame, and control system all sorted out before you can even dream of driving the car.
#1. Nodes
A node is essentially a computer that participates in the blockchain network. In a private blockchain, these nodes are typically hosted by your organization or trusted partners. Each node maintains a copy of the blockchain ledger and is responsible for validating transactions, storing data, and sometimes proposing new blocks.
There are typically two main types of nodes you'll encounter:
-
Full nodes, which maintains the entire blockchain history.
-
Validator nodes, which are specifically configured to take part in consensus.
In a private setup, you decide how many nodes exist and what each node is allowed to do. For instance, your development team might control validator nodes while a few read-only nodes are used by external auditors or APIs.
#2. Genesis Block
Okay, so every single blockchain kicks off with what's called a "genesis block" – literally the very first block in the whole chain. This is where you get to lay down some foundational rules, like:
-
Which accounts hold how much initial token balance
-
What the block time should be
-
What consensus mechanism will be used
-
Who the initial validator nodes are (if any)
Think of it as the blueprint for your blockchain’s DNA. If you're building on Ethereum or something EVM-compatible, this is usually defined in a genesis.json file.
#3. Consensus Mechanism
The consensus mechanism is what makes sure all the different nodes on a blockchain agree on its current state. On public blockchains, you'll usually find things like Proof of Work (PoW) or Proof of Stake (PoS), but frankly, for most private deployments, these are way over the top (and not very efficient).
Private blockchains usually lean towards faster and more predictable models like:
-
Proof of Authority (PoA) – Authority nodes are manually approved and rotate block proposals.
-
RAFT or IBFT – Byzantine fault-tolerant protocols often used in enterprise chains like Hyperledger or Quorum.
#4. Network and Peer Configuration
Once nodes are defined, they need to discover and connect to each other. This is handled by a peer-to-peer (P2P) networking layer, which enables nodes to broadcast transactions and blocks.
#5. Smart Contract Layer (Optional)
Now, depending on what you're trying to do, you might also want to put some smart contracts into play. These are basically self-running programs that live on the blockchain and handle all sorts of logic, like moving tokens around, managing who can access what, or enforcing specific business rules.
#How to Create a Private Blockchain: Setting Up Your Infrastructure
When you're putting together a private blockchain, your infrastructure is just as crucial as the code you're writing. Things like validating blocks, reaching consensus, running smart contracts, and getting your nodes to talk to each other (peer-to-peer networking) all need a good amount of computing muscle. This is especially true if you're looking to grow or if you're running nodes with multiple jobs, like those handling RPC requests, acting as validators, or monitoring the network.
For this guide, we will be hosting everything on Cherry Servers—a provider purpose-built for high-performance, customizable infrastructure.
For our setup, we’ll be using the AMD Ryzen™ 7700X Decicated Server, which offers:
-
CPU: AMD Ryzen 7700X — 8 cores / 16 threads @ up to 5.4GHz
-
RAM: 64 GB DDR5
-
Storage: 2×1 TB NVMe SSD
-
Bandwidth: 30 TB traffic with a 1 Gbps uplink
-
OS: Ubuntu 24.04 LTS (our chosen environment)
While Cherry Servers is our top pick for this guide, you could totally run this setup well on other cloud providers too, like Hetzner, DigitalOcean, Vultr, or even AWS EC2, as long as the machine has similar specs.
#🔐 Logging In via SSH
Once your server is provisioned (which usually takes just a few minutes):
Use this command to SSH into your machine (replace with your actual IP):
ssh root@your-server-ip
If you’re using a private key:
ssh -i /path/to/cherry-key.pem root@your-server-ip
After logging in, it's good practice to immediately update the OS and install essential packages:
sudo apt update && sudo apt upgrade -y
sudo apt install curl git unzip build-essential jq net-tools -y
Also, allow critical ports needed for blockchain communication:
sudo ufw allow 30303/tcp   # Ethereum P2P networking
sudo ufw allow 8545/tcp    # RPC server (if exposed)
sudo ufw allow 22/tcp      # SSH access
sudo ufw enable
And for operational hygiene, it’s smart to create a non-root user to run your chain:
adduser chainops
usermod -aG sudo chainops
sudo su - chainops
From here on, all node software (Geth, Besu, Polygon Edge, etc.) will be installed and configured under this user.
#Creating the Genesis Block and Launching the Node
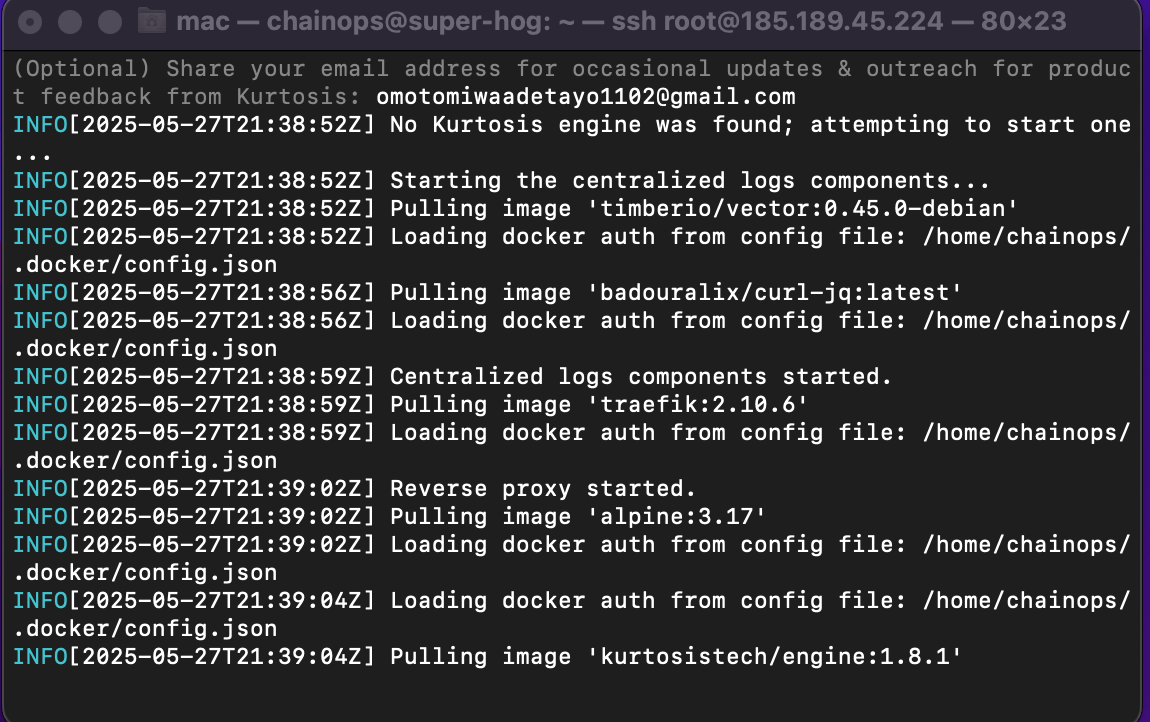
Spinning up a private Ethereum network in 2025 isn't as simple as just firing up Geth anymore. Now, it's about getting an execution layer, a consensus layer, and validators all working together, perfectly aligned with Ethereum's Proof of Stake (PoS) architecture. Good news is, Kurtosis takes all the headache out of this by wrapping everything up into one powerful, developer-friendly command-line tool.
By the end of this section, you’ll have a fully operational Ethereum network running locally with block production, validator logic, and RPC endpoints — all set up in just a few steps.
#🛠️ Step 1: Install Docker, Kurtosis, and Geth
Before running your private network, make sure these three tools are installed.
#A. Docker
Install Docker the quick way:
curl -fsSL https://get.docker.com -o get-docker.sh
sudo sh get-docker.sh
Then give your user permission to run Docker without sudo:
sudo usermod -aG docker $USER
newgrp docker
Verify it:
docker --version
Next run the below command to start docker:
sudo systemctl start docker
#B. Kurtosis CLI
Install Kurtosis:
echo "deb [trusted=yes] https://apt.fury.io/kurtosis-tech/ /" | sudo tee /etc/apt/sources.list.d/kurtosis.list
sudo apt update
sudo apt install kurtosis-cli
Check it works:
kurtosis version
#C. Geth (for interacting with the running network)
Even though Kurtosis deploys Geth under the hood, installing it locally lets you use its JS console and tools:
sudo add-apt-repository -y ppa:ethereum/ethereum
sudo apt update
sudo apt install geth -y
Check it works:
geth version
#⚙️ Step 2: Define Your Network Configuration
To set up your private Ethereum network, you'll need to create a network_params.yaml file that specifies the network's parameters. Here's how you can do it:
-
Create the
network_params.yamlfile:Open your terminal and execute the following command to create the file with the necessary configuration:
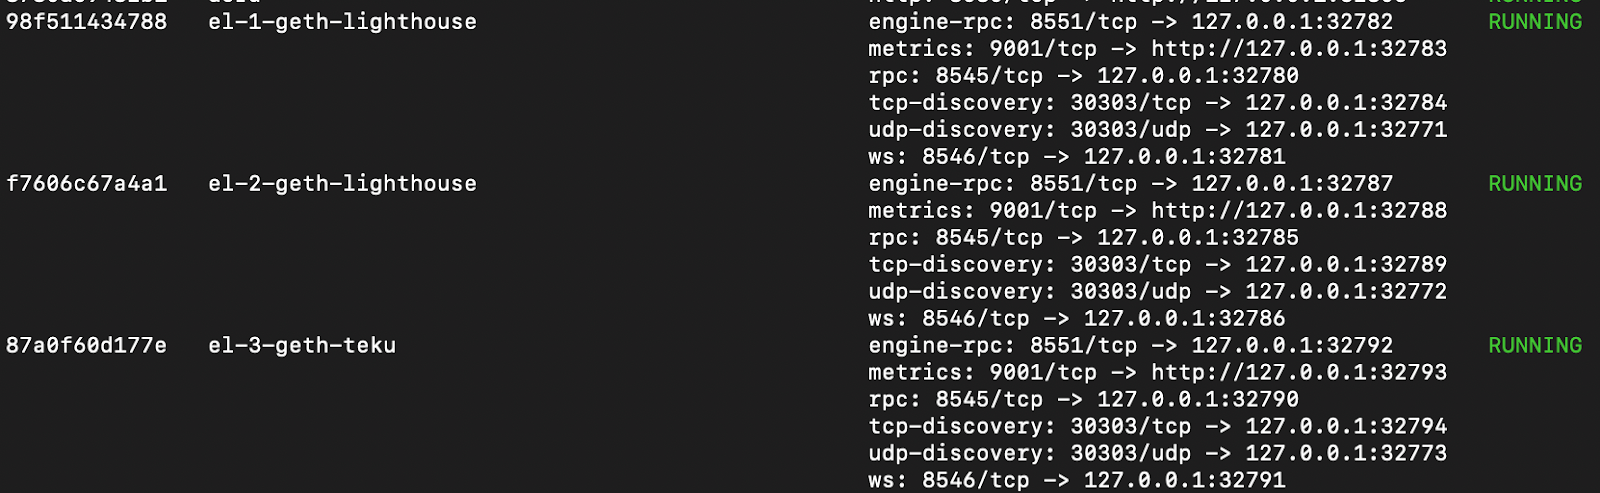
cat <<EOF > network_params.yaml
participants:
  - el_type: geth
    cl_type: lighthouse
    count: 2
  - el_type: geth
    cl_type: teku
    count: 1
network_params:
  network_id: "585858"
additional_services:
  - dora
EOF
Explanation of the configuration:
-
participants:
-
Defines the execution layer (EL) and consensus layer (CL) clients.
-
In this setup:
-
Two nodes use Geth (EL) and Lighthouse (CL).
-
One node uses Geth (EL) and Teku (CL).
-
-
-
network_params:
network_id: Assigns a unique identifier to your private network. Ensure this ID doesn't conflict with existing public networks.
-
additional_services:
dora: Adds the Dora block explorer for monitoring your network.
Feel free to customize the participants section to include different client combinations or adjust the number of nodes as needed.
#🚀 Step 3: Launch the Network with Kurtosis
With your configuration file ready, deploy your private Ethereum network using the following command:
kurtosis run github.com/ethpandaops/ethereum-package --args-file ./network_params.yaml --image-download always
Notes:
-
--args-file ./network_params.yaml: Instructs Kurtosis to use your custom configuration. -
--image-download always: Ensures the latest Docker images are pulled for each client.
Upon execution, Kurtosis will:
-
Generate genesis files for both EL and CL clients.
-
Set up the specified nodes with the defined client combinations.
-
Launch additional services like Dora for network monitoring.
#💰 Prefunded Accounts (Save These!)
As part of the setup, Kurtosis automatically creates a bunch of Ethereum accounts for you and fills them up with Ether. You'll see these accounts printed right in your terminal once the setup is all done — and they include:
-
The Ethereum address
-
The corresponding private key
⚠️ Important: These credentials are shown only once during the setup. Copy and securely save them when they appear in your terminal.
These accounts are ideal for testing and development. Since they’re pre-funded, you can immediately use them to deploy contracts, send transactions, and test dApps on your private chain.
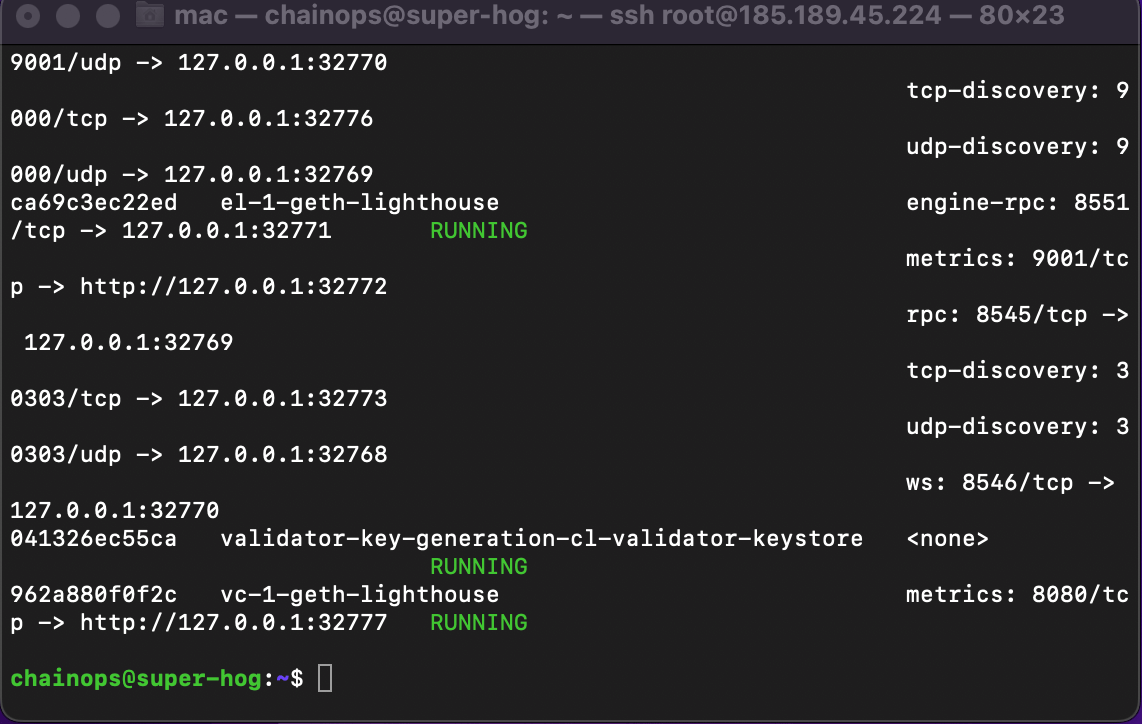
#🔍 Step 4: Discover RPC Endpoints
After deployment, identify the name of the created enclave:
kurtosis enclave ls
Then, inspect the enclave to retrieve service details and port mappings:
kurtosis enclave inspect <enclave-name>
Replace <enclave-name> with the actual name listed from the previous command. Look for entries like:
el-1-geth-lighthouse
  rpc: 8545/tcp -> 127.0.0.1:32769
This indicates that the RPC endpoint is accessible at http://127.0.0.1:32769.
Just a heads-up: since we're not running the server directly on our local machine, that port won't be reachable via localhost. To get to it, you'll need to swap out http://127.0.0.1 with the server's public IP address, which you can grab from the Cherry dashboard.
#🖥️ Step 5: Access the Geth Console Inside the Enclave
To interact with the Geth node, use the kurtosis service shell command:
kurtosis service shell <enclave-name> el-1-geth-lighthouse
This command opens a shell inside the el-1-geth-lighthouse service container. Once inside, you can start the Geth JavaScript console by running:
geth --datadir /data/geth/execution-data/ attach
Now, you're directly connected to the Geth node running inside the enclave.
#🌐 Step 6: Access the Dora Block Explorer
After deploying your network with Kurtosis, Dora is automatically set up as an additional service. To access it:
In the output of kurtosis enclave inspect <enclave-name>, locate the service related to Dora. It might be listed as dora or similar. Note the port mapping, which will look something like:
dora
  http: 8080/tcp -> http://127.0.0.1:32770
This indicates that Dora's web interface is accessible at http://127.0.0.1:32770.
Just a heads-up: Just like we mentioned in step5 since we're not running the server directly on our local machine, that port won't be reachable via localhost. To get to it, you'll need to swap out http://127.0.0.1 with the server's public IP address, which you can grab from the Cherry dashboard.

Head over to the URL we mentioned in your web browser. It should look something like this:
http://185.189.45.224:32770
You should see the Dora dashboard, where you can explore blocks, transactions, and other network metrics.
Note: The port number (32770 in the example) is dynamically assigned and may differ in your setup. Always refer to the actual port number obtained from the kurtosis enclave inspect command.

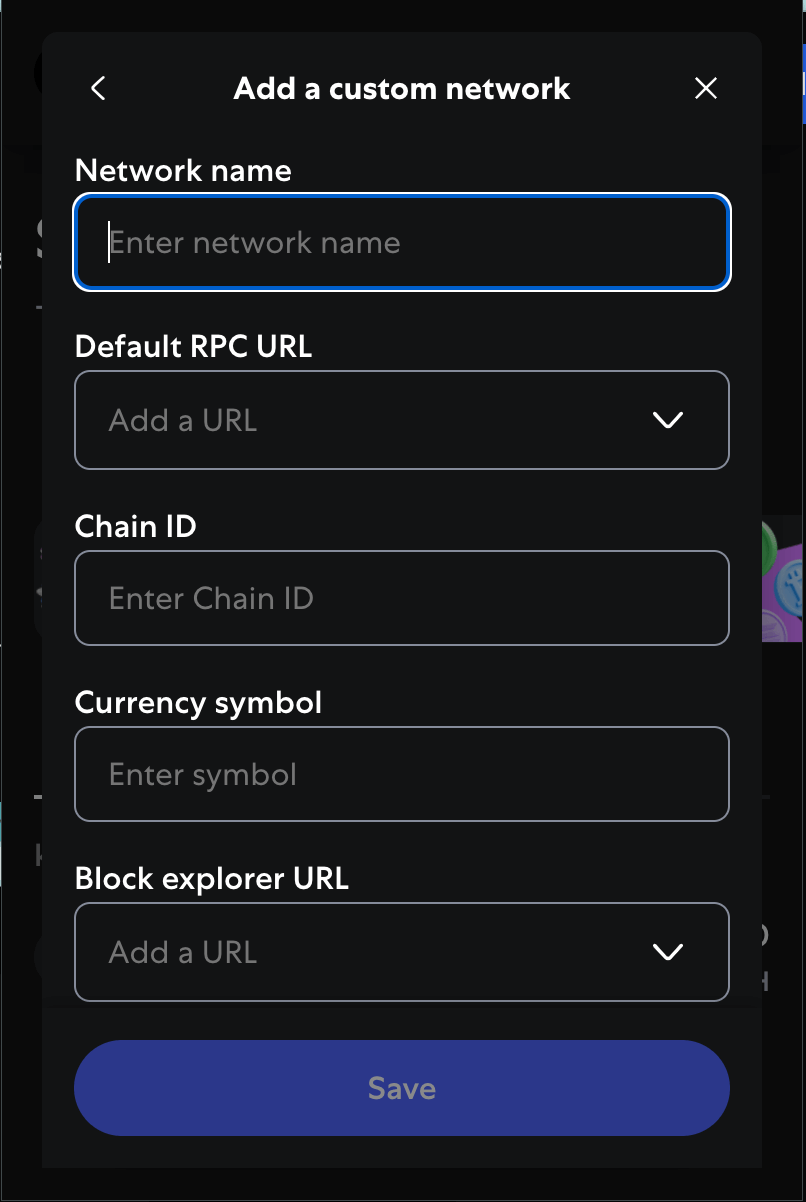
#🦊 Step 7: Connect MetaMask to Your Private Chain
To interact with your private network via MetaMask:
-
Open MetaMask and navigate to the network selection dropdown.
-
Click on "Add Custom Network"
-
Enter the following details:
-
Network Name:
Kurtosis Private Chain -
New RPC URL:
http://<your-server-ip>:32769(RPC url you got from step 4) -
Chain ID:
585858(as specified in yournetwork_params.yaml) -
Currency Symbol:
ETH -
Block explorer URL: (the URL you got from step 5)
-
-
Save the network configuration.
Now, MetaMask is connected to your private Ethereum network, enabling you to interact with dApps and smart contracts deployed within this environment.
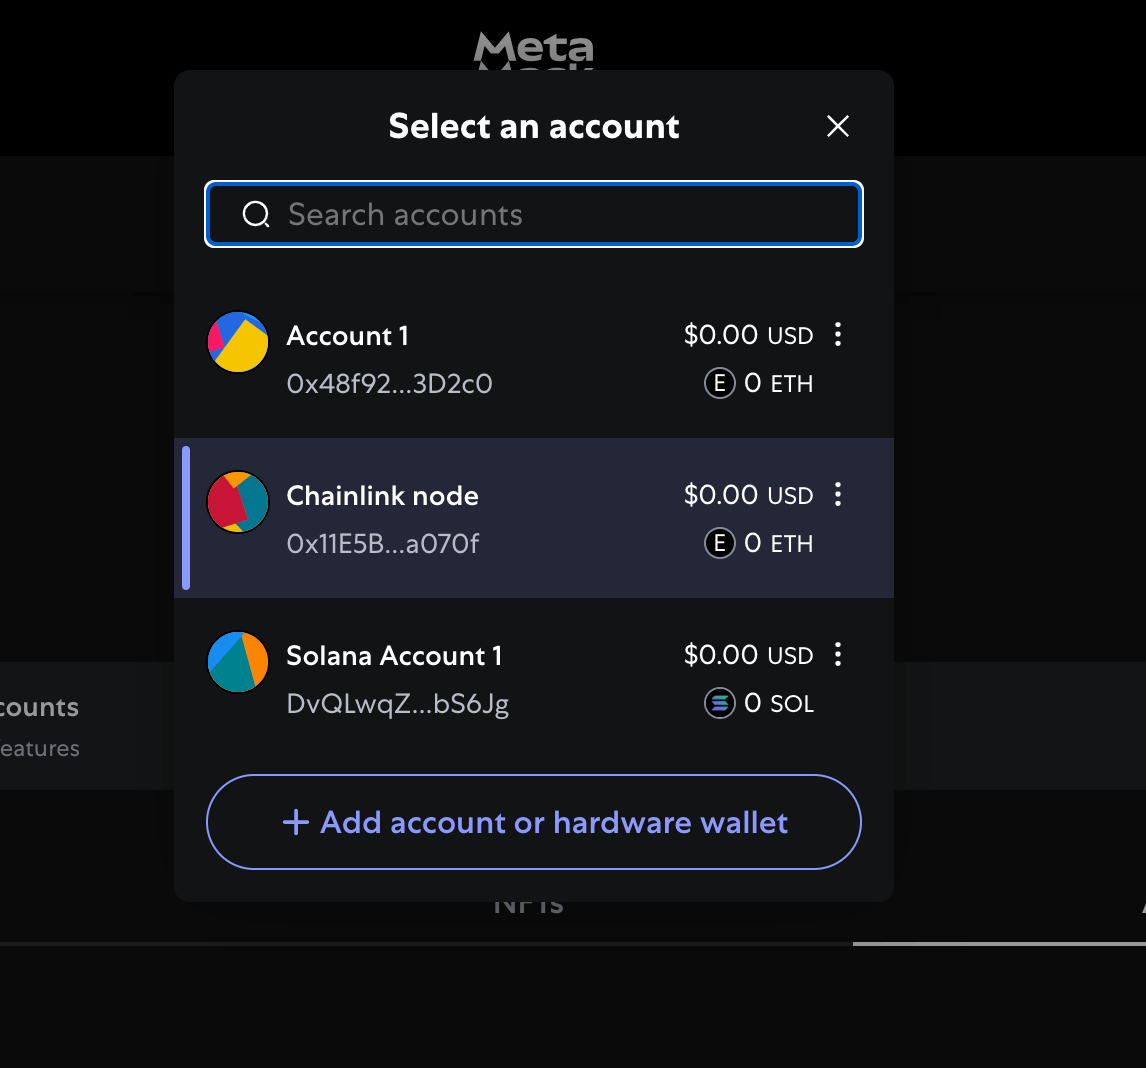
#🦊 Importing a Prefunded Account into MetaMask
To use your private blockchain from your web browser, you'll need to add one of the accounts that already has Ether (the ones from step 3) into MetaMask.
Here’s how to do it:
-
Open MetaMask in your browser.
-
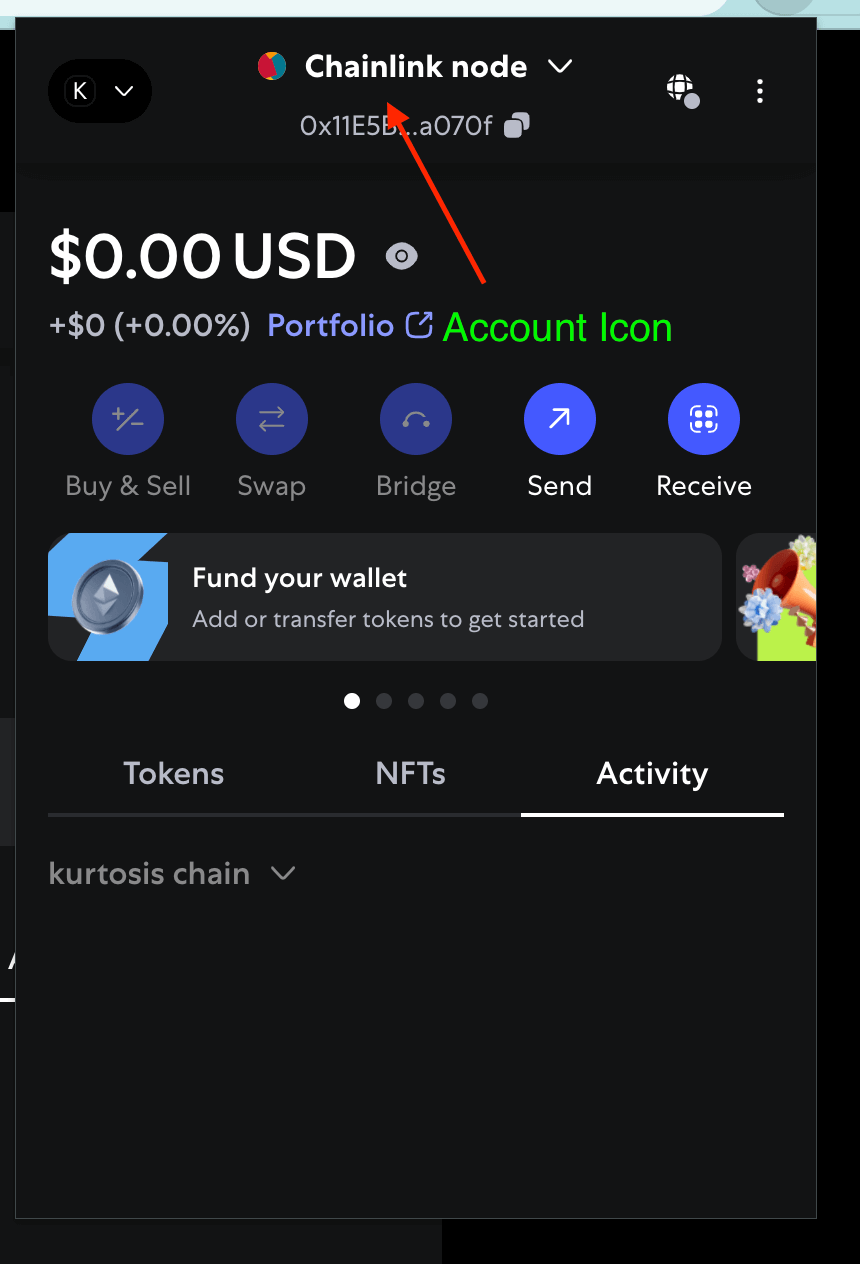
Click on your account icon in the top.
-
Select “Account account or hardware wallet” from the dropdown.
-
Choose “Private Key” as the import method.
-
Paste in one of the private keys you copied from the Kurtosis setup output.
-
Click “Import”.
MetaMask will instantly add that account, along with the preloaded balance from your private network. You can now use it to interact with contracts or dApps just like you would on mainnet or a public testnet — but everything runs locally.
✅ Tip: Make sure MetaMask is connected to your private chain. You can do this by adding a new network in MetaMask using the RPC URL and Chain ID specified in your Kurtosis config or inspect output.

#🧪 Optional: Deploy a Smart Contract Using Remix
If you'd like to take your private blockchain a step further, you can deploy a smart contract to it using Remix — a web-based IDE designed for Ethereum smart contract development.
This is entirely optional, but it’s a great way to test your private network and see it in action.
-
Open remix.ethereum.org
-
You’ll see a default file named
1_Storage.solwith the following code: -
  // SPDX-License-Identifier: GPL-3.0

  pragma solidity >=0.8.2 <0.9.0;

  contract Storage {

      uint256 number;

      function store(uint256 num) public {
          number = num;
      }

      function retrieve() public view returns (uint256){
          return number;
      }
  }
This contract allows you to store a number on-chain and retrieve it later.
#⚙️ Compile the Contract
-
Go to the Solidity Compiler tab
-
Make sure the compiler version is set to
^0.8.2Click Compile 1_Storage.sol
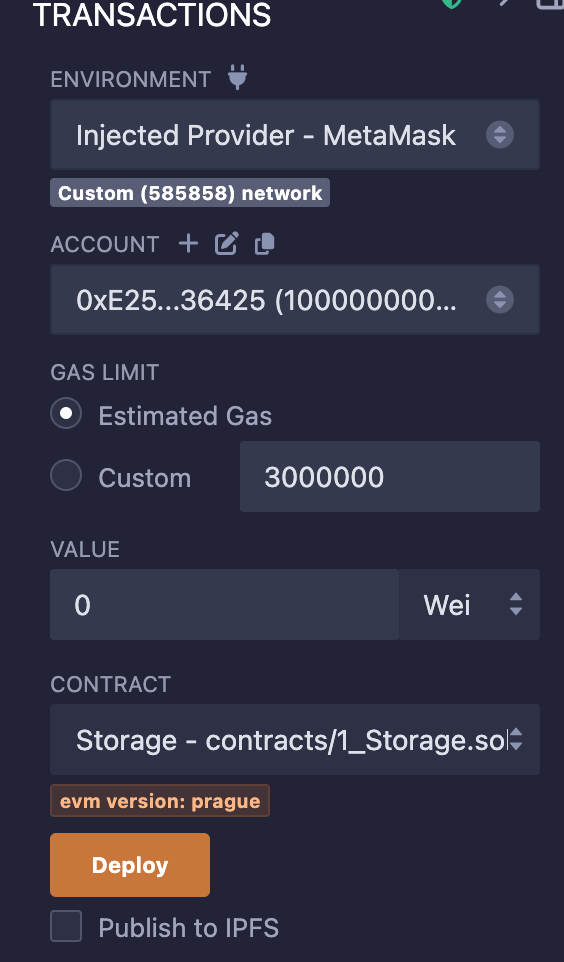
#🔗 Connect Remix to Your Private Chain
-
Make sure MetaMask is:
-
Connected to your private network (with the correct RPC URL and chain ID)
-
Using a prefunded account you imported earlier
-
-
In Remix:
-
Open the Deploy & Run Transactions tab
-
Set the Environment to
Injected Provider - MetaMask -
Approve the connection in MetaMask if prompted
-
#🚀 Deploy and Interact
-
With
Storageselected in Remix, click Deploy -
MetaMask will prompt you to confirm the transaction — approve it
-
Once deployed, you’ll see the contract instance in Remix’s interface
You can now:
-
Use the
store()function to save a number -
Use the
retrieve()function to read it back

#🧾 Conclusion
In this guide, we walked through how to build your very own private Ethereum blockchain. We covered everything from setting up a dedicated Ubuntu server and installing essential tools like Geth and Docker, to finally launching your network and interacting with it using MetaMask and Remix. Each step was designed to make it simple for you to get a fully functional blockchain development environment up and running.
This setup gives you the freedom to test smart contracts, simulate transactions, and explore decentralized application (dApp) workflows in a space that's both controlled and free of costs. It's perfect for learning, quickly building prototypes, or for your internal team's development needs.